
The starting point for SeePilgrims was the Kinect library for Processing, as nicely outlined on Daniel Shiffman’s blog post on Processing and Kinect. As he explains, development of and access to the openNi library was stopped when Apple acquired the technology. This meant I never got very far with my previous experiments with Kinect. Daniel’s post and the libfreenect library opened this back up.
The obvious one with the depth data is to use thresholds to strip out items close and far to give you a depth of field in which your human figure can be isolated, with lamps, furnishings, ceiling and floor all removed.
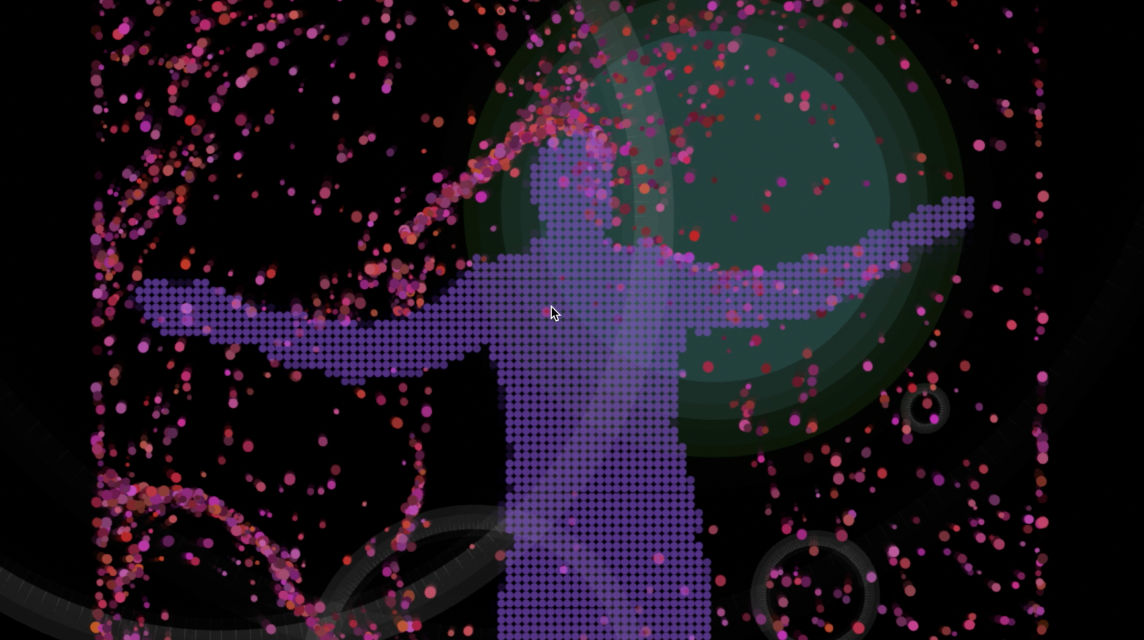
This is still just a set of points, rather than any kind of data object you can do anything with, but you can, at its simplest, render those points and play with them visually. This formed the basis for most of the themes in SeePilgrims. I was a little disappointed not to be able to access the skeleton data from the Kinect. This is the power behind the success of the Kinect, in which some algorithms calculate the likely position of a hand, head, torso, etc from the depth data, and then present this as a set of points/vectors upon which you can build interactions. Without this, and without the wherewithal to calculate this or outlines myself from the given data, I accepted the constraints and set to work finding out what I could do with it.
The depth data uses a resolution of 640×480, and with a point rendered at each corresponding pixel on a 640×480 Processing canvas, you get your human shape (or dog, or lamp shape). You can use the depth data with some z manipulations to give a 3D effect as well, so if you render this in P3D and rotate around the y you get a nice, realtime 3D pin-art of what is in front of the Kinect. I took this, with a few modifications, as the basis for my PinkUshion theme.
Most of my themes simply use the fact that a point on the plane is occupied or not, to give me a visual effect. If it is occupied over several frames I can increase the visual intensity of that (set of) pixel(s) to give a kind of heat map. When the target moves away, I can fade that over a few frames to give a kind of ghost or vapour trail. This, with a HSB colour scheme, was the basis for the Movatron theme.
Another trick is to use the transition of a cell in the “me” matrix from occupied to unoccupied rather than a simple on/off. So by making that transition happen over a few frames, I get another ghosting effect that works well with vigorous movement and dancing. This is the basis for Reversi and Reversi2.
In my Dust theme, I have a few thousand translucent particle object that float around the canvas as different speeds. When they conincide with the position of an occupied cell of the me object, they change colour. This is a much less crisp effect than, say, Reversi, but it is quite soothing to watch.
Now, one of the effects of this processing for each object, against each cell on the “me” matrix of occupied space, is that I am really killing the framerate at which I can render. The solution (again cribbed from Shiffman’s sample code) is to introduce a “skip” when traversing the depth data. If y=100, x=100 is occupied, than I can skip to y=100, x=104 and take another sample and still get an effective detection of a human outline. Even with a skip value of 6 (so that is 640×480 resolution stepped down to 106×80) You can still pick up individual fingers at a distance of 2.5m. That’s plenty good enough for my visuals. The downside is that this can tend to look quite blocky for a non-moving human outline. The trick to overcome this? In some themes (Flow3, Swishy) I am really only using the human shape to influence the behaviour of other visual objects. In other themes (Reversi, Echoes) I render each cell in a continuously changing way so that it matters less.
Flow3 borrows a feature from Shiffman’s Nature of Code book and examples. Several hundred objects make speed and direction decisions based on their current vector and the hidden “flow” vectors mapped behind the canvas. These flow vectors vary cell to cell based on some Perlin variations, and the continuously shift, a bit like wind or tide patterns. These organic flows are then disrupted by cells occupied by the “me” object, which has very strong flow vectors away from the centre of “mass” The effect is little blobs that flow in a natural pattern, but are repelled from the human shape, so they appear to swarm around the outline, only occasionally passing through the target shape.
Swishy is based on an old Processing project of mine that has colour petal objects shifting towards or away from a central focus. The centre position of this focus is controlled by the centre of mass of the “me” depth object. So the petals seem to attract towards/repel from the human figure as it moves.
The Kaleidoscope effects are just that. They take a segment of the RGB feed and repeatedly stamp it on the screen in a pattern according to the theme.
The classic kaleidoscope takes a triangular segment, whose central angle is based on the number of Kaleidescope segments. This segment is then repeated and alternately reflected on the canvas to form a complete circle. The number of segments, size of the segments, and therefore the complexity of the effect varies during the theme (triggered by bass beat detection). There is a linear and a “teeth” variations of this in other themes.
I’ve talked a little of the framerate problems, generally hampered by the amount of processing I have to do with each captured frame of depth information. This is much worse in those themes with hundreds of visual objects who each have to calculate position and effects with respect to all the cells of the “me” depth object. This was mitigated with a lower resolution “me”. The lowest tolerable frame rate was around 14. Lower than this appeared very jerky.
Both the triggering as a beat event, and the value of the decaying parameter was available to be used by themes.
I took the functionality of each visual idea and “thematized” them in a consistent Theme object. In fact the core theme object is pretty simple, and each theme was an inheritance of this with it’s update and display function wildly different.
The core theme object has a constructor when it is first instantiated, an initialisation function to reset it on the first and subsequent invocations, and update and display functions to be called on each frame. (in most cases all the work is done in display to prevent looping twice through arrays of objects).
So each theme can now be created (with all of its own variables and objects, and array lists of objects, initialised and run) using the same controls. These are then added to a polymorphed array list of themes, under the control of a themeSwitcher object. The theme switcher assigns 3 counters to each theme object: intro, ttl (time to live) and outro. The ttl controls how many frames the theme with cycle through before it is faded out (outro frames). The next frame is initialised and faded in for “intro” frames, in parallel with the outro of the current theme. Once intro and outro are complete, the next theme becomes the current theme. The (old) current theme is discarded, and the ttl counter starts for the current theme. When the last theme’s ttl expires the very first theme is loaded for intro.
This allows me to add as many themes to a loop as I wish, loop around them, and control how long they run for (in terms of frames).
The main Processing draw function now calls the theme switcher to tick through it’s counters. The theme switcher decides if it needs to load a new theme, and then it calls update and display on the current theme.
For my HD projector, I want the highest quality image I can get. So I am using the full 1280×800. I need to map the resolutions and the offsets between the aspect ratios so that I can confidently map a pixel of source (Kinect) data to a position and size on the rendered canvas. I use a display scaling object to do this. It takes source and destination resolutions, and a mapping mode to control wither differences in aspect ratios are resolved by letter-boxing or zooming in. It then makes available scaling and offset values to the themes.
To help with the experience being a joined up one for the audience, I wanted some background visuals that run all the time, irrespective of the running theme. This is achieved by having some very simple rings rendered, triggered by bass or hi-hat events and then expanding.
Performance and reliability
I also sometimes had a scenario where the depth input would freeze and only a full Kinect initialise would unfreeze it. Doing this while in play caused around a second of interruption to the feeds so I did not keep that in. At the festival we mainly avoided this by chance, and I could have the system looping many dozens of times without fault or interruption. This was good enough.
No comments yet.